Sunday, June 10, 2012

Sky of Blue Sea of Green

Some very interesting weather has come our way. This was the warmest spring on record. Then, just as school came to a close, we received record breaking rainfall. The Mississippi and the Saint Croix are still so badly flooded that they are closed for recreational boaters.

Of late the skies have cleared and the strong winds have died down. Perfect boating weather! My first outing was Lake Como. It's kind of small, but close to my house and a good way to build those rowing muscles. The trouble is that all the warm weather has produced a banner crop of sea weed, also known around here as Eurasian Milfoil.

Blue skies over Lake Como: lovely weather!
A banner crop of sea weed on Lake Como
Rowing through this stuff is no party. It gets tangled up with the oar blades and winds itself around them. There is a way to deal with this. You can row with the blades not fully immersed. This way the weeds cannot wrap around the oars. If (when) the weeds get tangled, the trick is to leave the oar in the water and let the blades trail aft. The weeds will slide off the ends. In either case, progress is quickly be reduced to a crawl and rowing becomes no fun at all. Whatever the case may be, I decided to give up on Como for this summer.

Tangled weeds on the oar blades

My next attempt was Lake of the Isles. The park service regularly rakes the water with a special boat that removes the milfoil. The boat was out that day, but it soon became clear that they were having trouble keeping up with the problem. Weed had surrounded the launch point and collected along the northern shore.

Weeds along the Northern Shore of Lake of the Isles

But it was a lot better than Como and I was able to make my way to the channel connecting to Cedar Lake. I passed the rake boat and soon things got weedy again.
Rake boat removing sea weed from the channel
I found still more weeds in Cedar Lake and gave up for the day. On the way home I passed under a couple of high school boys who were diving off a bridge. I snapped a couple pictures which you might enjoy.

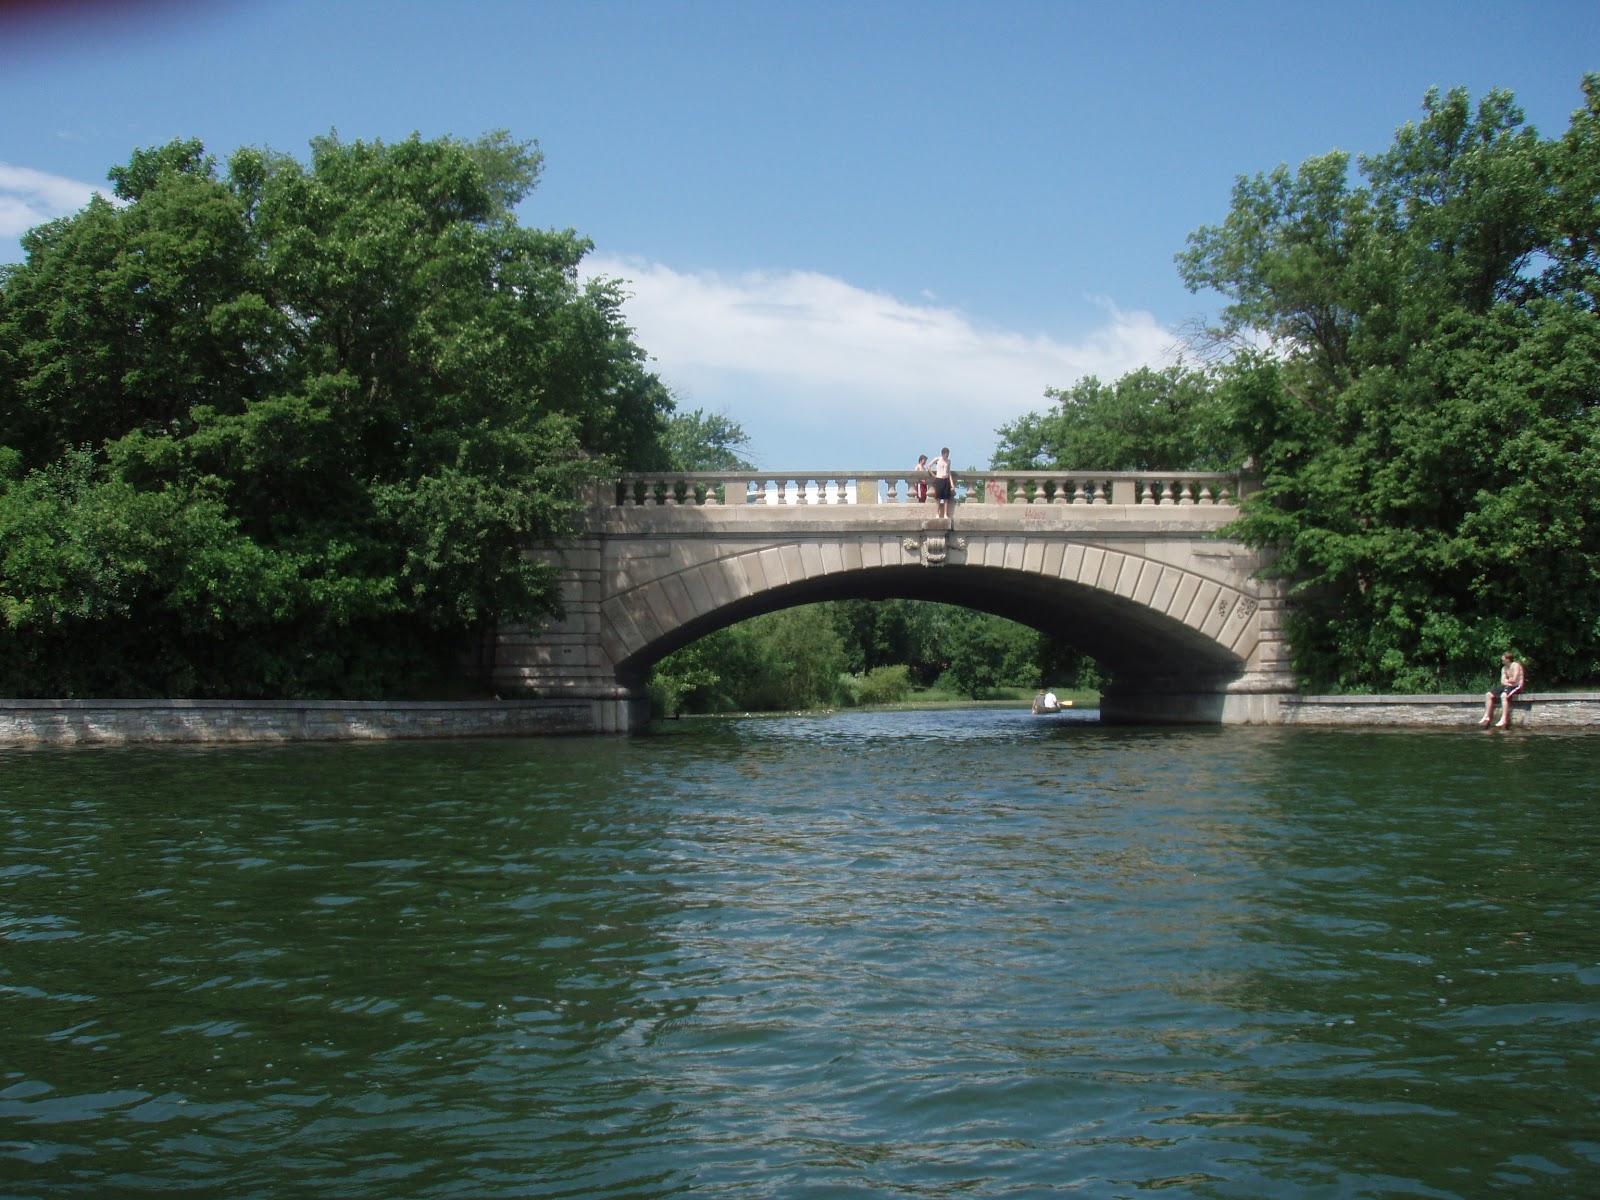
Getting up the courage to jump
And here he goes!
Breaking the water
It's too bad that milfoil has found its way into out lakes. I guess it was bound to happen. The only way to prevent the spread is for everyone to clean their boat hulls after each outing. Maybe that's a lot to ask, but it's the only way. "Sky of blue sea of green" is taken from the Beatles' song. We all do live in a yellow submarine. The planet ecosystem is a closed system. Everything that we do seems to come full circle. 

Saturday, March 31, 2012

When is it safe to go?

It's official. Spring is here. The water is cold, but in my opinion, it's safe to go. Last week on Lake Phalen, the temperature of the water was 53. That's pretty good.

Launching on Lake Phalen
Hypothermia is always a concern. In the off chance that you find yourself in the water, you have a limited amount of time to get out. This chart may help you decide when it's safe to launch.

Hypothermia Chart
IF THE WATER TEMPERATURE (F) IS:EXHAUSTION OR UNCONSCIOUSNESSEXPECTED TIME OF SURVIVAL IS:
32.5Under 15 MinutesUnder 15 - 45 Minutes
32.5 - 40.015 - 30 Minutes30 - 90 Minutes
40.0 - 50.030 - 60 Minutes1 - 3 Hours
50.0 - 60.01 -2 Hours1 - 6 Hours
60.0 - 70.02 - 7 Hours2 - 40 Hours
70.0 - 80.03 - 12 Hours3 Hours - Indefinitely
OVER 80.0IndefinitelyIndefinitely

Conditions get safer after the water temp climbs above fifty, but that's not the only factor. General  weather conditions are also to be considered. Sunny is safer. Air temperature of sixty or more is best. Wind speeds below ten MPH will be good.

So, wait for a good day. Stay close to shore and have a life jacket handy or on. Enjoy yourself!


Saturday, March 17, 2012

Boating on Saint Patrick's Day: Would You Believe It?


The temperature reached a record breaking 80 degrees today in Saint Paul. I thought I would would celebrate this glorious day by boating on Lake Como and sharing the photos with you. Enjoy!

Monday, February 13, 2012

Building a Cardboard Boat

Well, I haven't lost my mind. I've actually come to my senses. The idea is to design a boat in corrugated cardboard.  It couldn't be simpler. Boat designers spend a lot of time of time planning how to build a boat. They draft or they make models, both very time consuming. I know, I've been there.

Boat design, even for the smallest craft, is actually quite complicated. One of the problems deals with a drafting term called "true view." A boat hull is generally made from plywood which is bent or curved. This creates a twofold challenge: first, how to draw a curvalinear three dimensional object on flat paper. The second problem is how to determine what all of those curved components look like when they laid out on flat plywood in the shop.

Granted, there is computer software that does all this, but it is not cheap. On the other hand, one can make a scale model, but sometimes it is difficult to work these components up to full scale. A quarter inch can mean a lot when putting together plywood, but numbers that small are not always seen in the scale model.

The cardboard model is, of course, exactly the same size as the intended boat: no need for special software, no need to scale up from small to large. Along the way, I learned a lot about drafting out a boat (called lofting in the nautical business), bending and unbending, and fitting everything together as well. It only took a few hours to do. Along the way, I made a lot of small changes that will greatly improve the performance of this boat.

I begin by drafting the two bilge panels and cutting them  out.  The curves are drawn with  a spline  made from  half  inch mahogany

I tape them together along the center  line which has been cut  along a  gentle curve.

Then the panels are unfolded. Note that the stem is raised about 7 inches above the  work  table.  This  is a desirable hull feature in hull design called the rocker.  I know from experience that seven inches will keep the stem above the waves.

Next I add a stem, stern, and side strakes. The strakes are about  10 1/2 inches high.  Experience tells me this is about right. Too high and they catch the wind ( windage) too low and the boat could be swamped in rough water.  A temporary cardboard bulkhead is places in the center to support the hull shape.


The model still has a way to go. You may notice that I wrote out a couple notes on some of the components. I intend to do more cutting and trimming. 

When finished, this will be the dinghy that my summer class will build. I will transfer the work onto luan templates which they can copy.  See you then!


Friday, January 27, 2012

A Fast, Light Pulling Boat Part Two: Finishing Touches

I'm near completion, just a couple more tweaks which I will save until spring. Hope you enjoy the photos.
A coat of paint or two is spread on the bottom. The top strakes and the transom  are left  bright (with no stain) and varnished clear
The inside is also painted. I normally wouldn't do this, but  it  will be a nice way to show off the custom built rowing unit. The two mahogany bulk heads (or ribs) are placed a little forward and a little aft of the original specifications. This will allow for the seats to be relocated to distribute the weight more evenly.
The completed shell seen from a different angle. The Annapolis Wherry is as elegant as it is functional.
The wherry with the rowing unit mounted in place. It rests directly on the bulkheads in order to lower the center of gravity and render the boat more seaworthy. The rowing seat is clamped at the exact center of buoyancy. Unlike standard rowing units, the outriggers are designed to unlock and swing inboard for docking or transportation.
A closeup of the passenger's seat. Note how the entire unit can be clamped in place  without  using any tools.
The seats are curved along the same radius as the boat hull. The two thumb screws  can be loosened  so that the  seat can be repositioned.

The rear seat will also serve a second function when the rower is alone. If you have been reading this blog, you may have noticed that a lot of the city lakes are connected by narrow bridges and channels, rendering oars useless. So, to negotiate these waters, the rower can stow the oars inside the boat, move to the rear, and paddle the wherry like a canoe.
The forward bracket is also clamped in place with a thumbscrew. No tools required!

The Annapolis Wherry has proved to be a lot of fun. Along the way, I have learned something about myself: I enjoy building boats as much as I enjoy rowing them!

The details about my boat building class should be published next week. If you are interested, feel free to check back then.

The boat is supported by an extra long trailer. I bought an older model on Craigslist and welded on an extra five feet.


Saturday, January 14, 2012

A Fast, Light Pulling Boat Part One: Under construction

I have been pretty happy with my little dinghy. It is easy to transport, quite seaworthy, and easier to row than the larger city issue fiberglass boats. But the dinghy has it's short comings. I've always wanted a fast, light pulling boat, something that can move through the water more easily.

So when I saw an ad for an Annapolis Wherry kit on Craigslist I jumped at the opportunity. It has flawlessly good lines, is quite sea worthy, and, even though it's almost eighteen feet long, it weighs only 65 lbs- the same as the eight foot dinghy!

As it turned out the kit was badly damaged. The owner had copied the shapes parts on to mahogany then proceeded to ruin those pieces as she cut them out. But, in spite of all those problems, the price was right! So, I bought it and put it into storage waiting for winter to come. I began by sorting the pieces and deciding how to salvage the project. To make a long story short, I've pretty much succeeded and made some changes to the original design.

The Wherry under construction: There will be no fixed seats
You may have read the previous blog about building a rowing unit. The plan is to install it in the wherry. The original plans called for fixed seats with a rowing unit mounted over the top of them. It struck me as a little strange so this new boat will not have fixed seats, just a rowing unit with two seats fastened to the  monorail. I should save a couple of pounds along the way.

putting a coat of epoxy on the outside


The entire boat is finished with epoxy from Polygem. The product is safer and greener than the other stuff.  I think it took about a gallon and a half. The hull gets its strength from the filets which join each strake to the next. The filets are actually stronger than the wood surrounding them. Epoxy and lapstrake construction seem to have been made for one another.

A layer of fiberglass is also epoxied on the bottom strakes both inside and out. This adds still more strength and protects the woodwork from scuffs and scrapes. Everything sets up perfectly clear and you can't see the glass cloth. No one uses polyester resin anymore. I should be able to finish some time soon. Call it "part two." I'll post more photos then.


Sunday, January 8, 2012

Basic Boating as a College Course

I am pleased to report that I will be teaching boat building this summer at Concordia University through the office of Continuing Education. The registration details and numbers are posted below. The nice part is that it will be offered during the first half of the summer session. You will have time to take it out on the water!

One need not have any special skills or background to build a stitch and glue boat. The entire approach is geared for beginners. You will have completed a nice little 8 foot pram or dinghy by the end of the course. Feel free to bring a friend with you to help get things done. It's more fun that way!

My friend Rachel helped me with The Prodigal. We had a great time time. You can see this boat (and Rachel too) throughout this blog
After you finish, you will need to take your boat home. You could put it on a car top if you get a roof rack or borrow a pick up truck. It is small enough to fit in back. You will need to paint (or varnish) it, and install hardware such as oarlocks. That's about it it. You will want to purchase oars and a life vest or two. The state of Minnesota does not require licensing for boats this size.

This is a great bargain. Another builder charges $750.00 for tuition and $1000.00 for materials and supplies.

Registration Information
Go to website http://csp.reachlocal.com/?scid=1756224&kw=2088906:25675&pub_cr_id=5641980151 and then click on "continuing education" found at the bottom of the page. click on "search for classes." Course code: FNA 213, Place: room 131 Theatre scene shop, Time: Tuesday, Wednesday, Thursday from 6PM til 10PM beginning 5/29/12 and ending 6/28/12. Tuition will be $690 if you want college credit or just $250.00 for no credit. An additional lab fee of $150.00 (cash) is due on the first day in order to cover the cost of materials. You can click through on line registration after that.

This is the design to be built
This boat is actually a little shorter than eight feet. The lab fee will cover all the materials needed to build with 1/4" marine grade fir plywood, fir seats, and misc trim. If you desire more expensive materials there will be an extra charge when you place your order.There will be some differences between the project and this picture. For the most part there will be less trim on the class project. The hull shape will be improved. All wood surfaces will be glued and sealed with clear epoxy. The joints will be reinforced with fiberglass. With a little care, the completed boat should last indefinitely. For more details, check back earlier in this blog: The Build.
Sealing the wood with epoxy

For a short boat, it rows easily, handles well in the roughest chop, and can be outfitted with a trolling motor or regular short shaft outboard.

Class size will be limited to just 6. Make sure to register early to get in. For more information, please contact me (Jim): seemann@csp.edu